Mini pizzas are a fun, interactive, and delicious way to get kids involved in the kitchen. Instead of serving traditional pizza, creating mini pizzas allows children to customize their meals with toppings they love. This activity encourages creativity, makes mealtime more exciting, and can even help picky eaters try new ingredients. Best of all, making mini pizzas doesn’t require complicated techniques or professional baking skills. With a few simple steps, you can transform ordinary ingredients into a delightful pizza-making experience for your family.
Gather Your Ingredients and Supplies
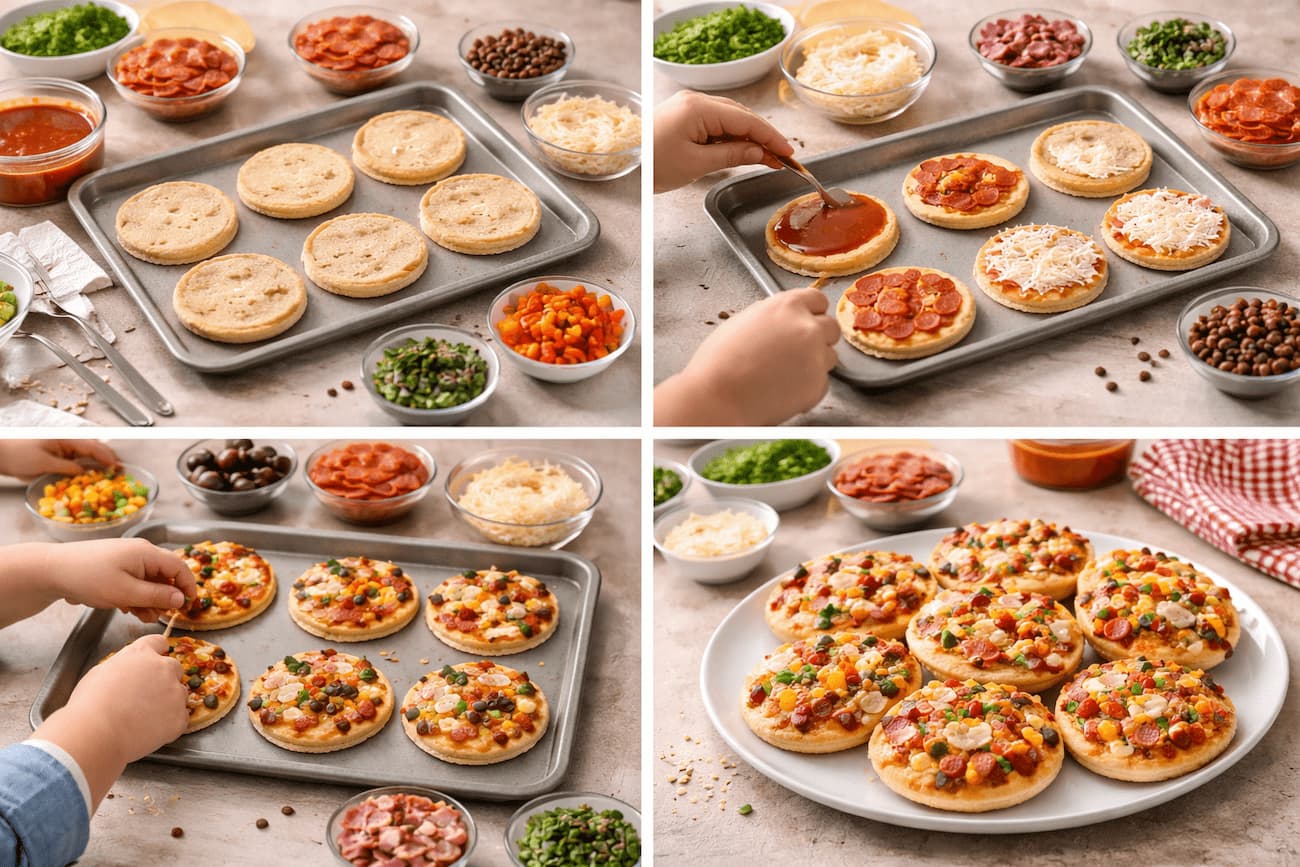
The first step in creating mini pizzas is gathering all the ingredients and supplies you’ll need. This preparation ensures that the process runs smoothly and that kids can focus on decorating and assembling their pizzas rather than searching for items.
Ingredients
Most mini pizza recipes use basic ingredients you may already have in your kitchen. You will need:
- Pizza Bases: You can use store-bought mini pizza crusts, English muffins, bagels, pita bread, or even sliced bread.
- Sauce: Tomato sauce, pizza sauce, or even a simple marinara works perfectly.
- Cheese: Shredded mozzarella is traditional, but cheddar, Monterey Jack, or a blend works too.
- Toppings: Various vegetables like bell peppers, tomatoes, mushrooms, and olives; proteins like cooked chicken, pepperoni, or ham; and fun options like pineapple or corn.
Supplies
Having the right tools on hand makes the pizza-making process easier and safer for kids:
- Baking sheets or pizza pans
- Parchment paper to prevent sticking
- Small bowls for toppings
- Spoon or small ladle for spreading sauce
- Butter knives or small spatulas for safety
By preparing all ingredients and tools ahead of time, kids can enjoy creating their mini pizzas without interruptions.
Choose the Right Base
The base is the foundation of any pizza, and for mini pizzas, it’s important to choose something that’s the right size and easy to handle.
Options for Mini Pizza Bases
- English Muffins: Cut in half, English muffins are perfectly sized for a child’s hand. They toast nicely and hold toppings without becoming soggy.
- Bagels: Sliced bagels make thicker, heartier mini pizzas and are ideal for older kids or larger appetites.
- Pita Bread or Tortillas: These are lightweight, flexible, and cook quickly, making them ideal for a quick pizza snack.
- Bread Slices: Regular sandwich bread works well for a fun twist. You can even toast it slightly before adding toppings to keep it from getting soggy.
Choosing the right base depends on the preferences of your kids and the type of crust you want. For a crunchy base, English muffins or pita bread are excellent. For a soft and chewy experience, bagels or thick bread slices work best.
Spread the Sauce Evenly
The sauce adds flavor and moisture to the pizza, but it’s important not to overdo it, especially for mini pizzas. A thin, even layer ensures the crust doesn’t get soggy.
Tips for Spreading Sauce
- Use a small spoon or ladle: This helps control the amount and prevents spills.
- Start from the center: Spread outward in a circular motion to cover the surface evenly.
- Leave a border: Leaving a small edge around the crust helps the pizza hold together and creates a “crust” effect.
Allow kids to spread their own sauce if they’re old enough. It’s messy but fun, and it encourages creativity and independence in the kitchen.
Add Cheese for a Gooey Base
Cheese is a must for any pizza, and mini pizzas give kids the freedom to choose how much or how little they want. Shredded cheese melts evenly and helps toppings stick to the pizza.
Cheese Tips
- Use a generous but balanced amount: Too much cheese can overpower the pizza or make it greasy.
- Mix cheeses for flavor: Mozzarella for melting, cheddar for sharpness, or even a little Parmesan for extra flavor.
- Teach kids to sprinkle evenly: Encourage them to cover the sauce lightly while leaving room for toppings.
Cheese also acts as a “glue” for other toppings, so it’s important to spread it thoughtfully.
Let Kids Pick Their Toppings
The most exciting part of creating mini pizzas is letting kids choose their toppings. Giving them options encourages experimentation and can help introduce new vegetables and flavors in a fun way.
Vegetable Toppings
- Bell peppers (sliced or diced)
- Cherry tomatoes (halved)
- Mushrooms (sliced)
- Spinach leaves or kale
- Corn, peas, or olives
Protein Toppings
- Cooked chicken, turkey, or ham
- Pepperoni or salami slices
- Beans or lentils for a vegetarian option
Fun and Sweet Toppings
- Pineapple chunks
- Sliced apples or pears (for a dessert-style pizza)
- Small dollops of cream cheese or ricotta
Encourage kids to mix and match ingredients to create colorful, creative pizzas. This not only makes the process fun but also teaches them about flavors and textures.
Arrange Toppings with Care
Once toppings are chosen, help kids arrange them on the pizza. Too many toppings can make the pizza difficult to cook evenly, while too few can result in a bland experience.
Tips for Topping Arrangement
- Spread evenly: Make sure toppings are distributed across the pizza for balanced bites.
- Layer wisely: Place heavier toppings like meats or thicker vegetables under the cheese to prevent burning.
- Create patterns: Encourage kids to make fun designs or faces, which adds excitement to the meal.
This step also teaches basic culinary skills, like layering and portion control, in a playful way.
Bake Mini Pizzas Safely
Baking is the final step to turning ingredients into a delicious mini pizza. To ensure safety, please closely supervise children and personally manage the oven if they are too young.
Baking Instructions
- Preheat the oven: 375°F (190°C) works well for most mini pizzas.
- Use a baking sheet: Line it with parchment paper to prevent sticking and make cleanup simple.
- Bake for 8–12 minutes, monitoring the cheese to ensure it melts and bubbles without burning.
- Cool slightly before eating: Allow pizzas to rest for a minute or two to avoid burns.
You can also use a toaster oven for small batches, which is convenient for kids’ lunch or snack sizes.
Experiment with Flavors and Sauces
Mini pizzas are versatile and allow endless experimentation with sauces and flavors. Kids can try classic tomato sauce or venture into new tastes.
Sauce Ideas
- Pesto: Basil or spinach pesto gives a fresh, green flavor.
- Alfredo or White Sauce: Creamy options pair well with chicken and vegetables.
- Barbecue Sauce: Great for a tangy, smoky twist with cooked meat toppings.
- Hummus or Yogurt Base: For a lighter, healthier alternative.
Experimenting with different sauces teaches kids that food can be fun and customizable and helps them develop their palates.
Make It a Learning Experience
Creating mini pizzas isn’t just about food—it’s also an educational activity. While making pizzas, kids can learn the following:
- Measuring ingredients: Counting cheese handfuls or spoonfuls of sauce
- Following instructions: Baking and assembling in steps
- Nutrition basics: Discussing the benefits of vegetables and proteins
- Creativity: Designing their own pizza with colors and shapes
By framing pizza-making as both fun and educational, you create a positive mealtime experience that kids will remember.
Serve and Enjoy Together
Once the mini pizzas are baked and slightly cooled, it’s time to eat. Serving these pizzas family-style allows everyone to share creations and compliments each other’s efforts.
Serving Tips
- Use kid-friendly plates: Small plates are easier for little hands.
- Encourage trying new toppings: Kids may be more willing to taste something new if they helped make it.
- Pair with sides: Fresh fruit, a simple salad, or veggie sticks complement mini pizzas nicely.
Sharing food that kids helped make can make mealtime more enjoyable and fosters positive eating habits.
Store Leftovers Safely
If there are any leftover mini pizzas, they can be stored for later consumption. Proper storage ensures they remain tasty and safe to eat.
Storage Tips
- Refrigeration: Store in an airtight container for up to 2–3 days.
- Reheating: Use a microwave, oven, or toaster oven to warm the pizza.
- Freezing: Wrap individually and freeze for up to a month; reheat in the oven for best results.
Having leftover mini pizzas ready makes for a convenient lunch or snack without extra effort.
Conclusion
Creating mini pizzas that kids can customize is a fun, interactive, and educational experience. By gathering simple ingredients, letting children choose toppings, and teaching them basic cooking skills, you can make mealtime exciting and enjoyable. Mini pizzas are versatile, budget-friendly, and perfect for encouraging kids to try new flavors while having fun in the kitchen. Whether using English muffins, bagels, or pita bread as a base, the possibilities for toppings and sauces are endless. With a little creativity and preparation, you can turn a simple lunch into a memorable family activity that kids will love.
FAQs
1. Can I make mini pizzas with gluten-free or alternative bases?
Yes! You can use gluten-free bread, cauliflower crust, or rice cakes as a base to accommodate dietary preferences.
2. What toppings are best for picky eaters?
Start with familiar favorites like cheese, pepperoni, or tomatoes, and gradually introduce mild vegetables like corn or bell peppers.
3. Can mini pizzas be made ahead of time?
Yes. You can assemble mini pizzas in advance and store them in the refrigerator for a few hours before baking.
4. How can I make mini pizzas healthier?
Use whole-grain or whole-wheat bases, reduce cheese slightly, and add plenty of vegetables as toppings.
5. Can kids handle all steps of pizza-making?
Children can participate in safe tasks like spreading sauce, sprinkling cheese, and arranging toppings. Baking should be supervised by an adult.