Occasionally, you crave something sweet but don’t have the time or energy to bake. No-bake treats are a perfect solution. They are quick, easy, and can satisfy sweet cravings without the need for an oven. Whether you want a snack for yourself, a treat for the kids, or something to serve guests, no-bake recipes can save time while still delivering flavor and fun.
In this guide, we’ll explore simple step-by-step methods to create various no-bake treats in under 15 minutes. These ideas are beginner-friendly, require minimal ingredients, and can be customized to your taste.
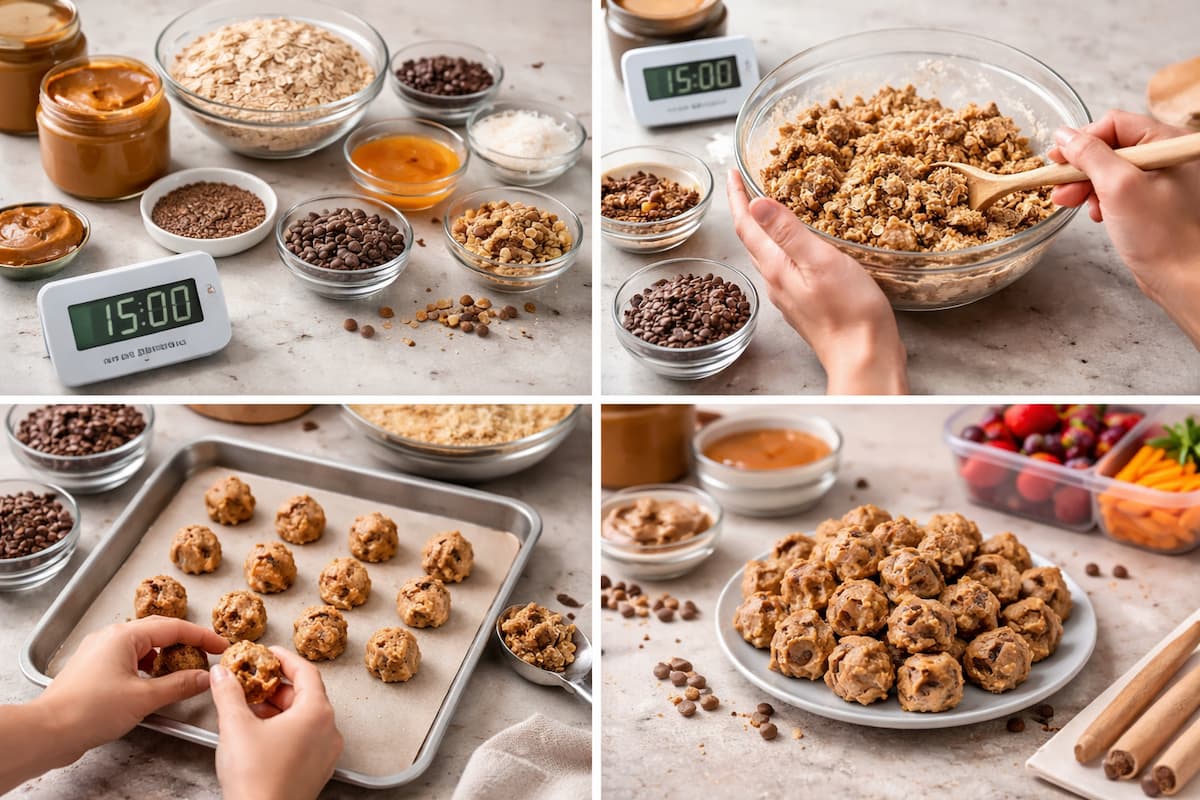
Step 1: Gather Your Ingredients and Tools
The first step in whipping up quick no-bake treats is preparation:
- Basic Ingredients: Nuts, oats, peanut butter, chocolate, honey, coconut, and dried fruits are versatile staples.
- Optional Add-Ins: Chocolate chips, seeds, cocoa powder, vanilla extract, and shredded coconut enhance flavor and texture.
- Tools: Mixing bowls, measuring cups, spatulas, cookie cutters, and parchment paper.
- Storage Containers: Small containers or airtight jars for storing treats if needed.
Having all ingredients and tools ready ensures that you can prepare treats quickly without interruptions.
Step 2: Choose Your Base
No-bake treats often rely on a binding base that holds everything together. Common bases include:
- Nut Butter: Peanut butter, almond butter, or cashew butter add creaminess and protein.
- Oats: Rolled oats or quick oats provide texture and fiber.
- Crushed Cookies or Graham Crackers: Adds a crunchy texture and sweetness.
- Dates or Other Soft Dried Fruits: Natural sweeteners that bind ingredients naturally.
Selecting the right base determines the texture, flavor, and nutrition of your no-bake treat.
Step 3: Sweeten Naturally
Avoid excessive refined sugar by using natural sweeteners:
- Honey or Maple Syrup: Easy to mix and provides moisture for binding.
- Agave or Molasses: Alternatives that can add a unique flavor.
- Mashed bananas or applesauce adds sweetness and extra nutrients.
Balancing sweetness with natural ingredients keeps treats enjoyable and healthier.
Step 4: Mix Ingredients Thoroughly
Proper mixing ensures your no-bake treats hold together:
- Combine Dry Ingredients: Mix oats, nuts, cocoa powder, and seeds in one bowl.
- Add Wet Ingredients: Incorporate nut butter, honey, or fruit puree gradually.
- Check Consistency: The mixture should stick together when pressed but not be too sticky.
- Use Hands or Spatula: Knead gently with hands or fold with a spatula for even distribution.
A well-mixed base ensures your treats don’t fall apart and maintain consistent flavor in every bite.
Step 5: Shape Your Treats
Making treats visually appealing increases enjoyment:
- Bite-Sized Balls: Roll mixture into small, uniform balls for snacks.
- Bars or Squares: Press the mixture into a lined tray and cut into squares.
- Mini Cups: Use silicone molds or paper cupcake liners for individual servings.
- Fun Shapes: During holidays or other special occasions, use cookie cutters to create themed shapes.
Shaping treats is quick and adds a playful element to your no-bake creations.
Step 6: Chill for Stability (Optional)
While many no-bake treats are ready to eat immediately, chilling can help:
- Refrigerate for 5–10 minutes: Solidifies nut butter and chocolate, making treats firmer.
- Freeze for 5 minutes: Creates a slightly firmer texture for bite-sized balls.
- Room Temperature: Some mixtures like chocolate-dipped nuts or granola clusters can be eaten immediately without chilling.
Chilling is optional but recommended for better structure and a satisfying bite.
Step 7: Add Texture and Flavor Enhancements
No-bake treats can be customized with various flavors and textures:
- Cocoa or Cinnamon: Sprinkle on top for extra taste.
- Chocolate Chips or Drizzle: Melted chocolate adds richness.
- Chopped Nuts or Seeds: Adds crunch and nutritional value.
- Shredded Coconut or Freeze-Dried Fruits: Enhances color and flavor.
Layering textures makes your treats more exciting and satisfying.
Step 8: Explore Quick No-Bake Recipes
Here are some beginner-friendly recipes that take under 15 minutes:
1. Chocolate Peanut Butter Balls
- Ingredients: Peanut butter, honey, oats, cocoa powder.
- Method: Mix, roll into balls, add optional chocolate drizzle, and chill for 5 minutes.
2. Energy Bites with Nuts and Dried Fruit
- Ingredients: Dates, almonds, chia seeds, coconut.
- Method: Blend dates, mix them with nuts and seeds, roll them into balls, and chill briefly.
3. No-Bake Granola Bars
- Ingredients: oats, peanut butter, honey, and chocolate chips.
- Method: Mix the ingredients, press into a lined pan, cut into bars, and optionally drizzle with chocolate.
4. Coconut Date Balls
- Ingredients: Dates, shredded coconut, almond meal.
- Method: Blend dates and almond meal, roll them into balls, and coat them with coconut.
5. Yogurt and Berry Parfait Cups
- Ingredients: Greek yogurt, honey, mixed berries, granola.
- Method: Layer yogurt, berries, and granola in cups; serve immediately or chill.
These recipes are versatile and allow substitution based on preferences and available ingredients.
Step 9: Store Treats Properly
Proper storage ensures treats remain fresh and delicious:
- Airtight Containers: Keeps treats from drying out or absorbing odors.
- Refrigeration: Nut butter balls, bars with chocolate, or yogurt-based treats last longer when chilled.
- Freezing: Freeze individual servings for longer storage and quick snack access.
- Labeling: Note the date to ensure you consume treats while fresh.
Well-stored treats stay flavorful and safe to eat for several days.
Step 10: Customize for Health Goals
No-bake treats can be tailored to suit dietary needs:
- Protein Boost: Add protein powder or nut butter for extra protein.
- Lower Sugar: Reduce honey or syrup; use more dried fruits for natural sweetness.
- Gluten-Free Options: Use gluten-free oats or almond meal instead of wheat-based ingredients.
- Vegan Options: Replace honey with maple syrup and use dairy-free chocolate or yogurt.
Customizing ensures treats are aligned with personal health goals while remaining quick and tasty.
Step 11: Make It a Fun Activity
Preparing no-bake treats can be an enjoyable experience:
- Family or Friends: Get children or friends involved for a creative bonding activity.
- Experiment with Flavors: Try different nuts, fruits, and spices for unique combinations.
- Theme-Based Treats: Create treats for holidays, birthdays, or special occasions.
- Decorate: Use edible sprinkles, chocolate drizzle, or nuts to enhance presentation.
Turning snack-making into a fun activity encourages healthy eating habits and creativity.
Step 12: Adapt for On-the-Go Snacks
No-bake treats are ideal for portable snacking:
- Pack in Lunchboxes: Bite-sized balls or granola bars are perfect for school or work.
- Travel-Friendly: Wrap bars in parchment paper for effortless transport.
- Post-Workout Snack: Nut-based energy bites make convenient post-workout fuel.
- Emergency Snack: Keep a jar in the pantry for quick access to healthy treats.
Portability increases the practicality of no-bake treats in everyday life.
Step 13: Experiment With Seasonal Ingredients
Seasonal ingredients make treats fresh and intriguing:
- Summer: Berries, mango, or peaches for fruity energy bites.
- Autumn: Pumpkin puree, cinnamon, or nut-based flavors for cozy treats.
- Winter: Dried cranberries, nuts, and cocoa for festive flavors.
- Spring: Light fruits like strawberries or apricots for refreshing snacks.
Incorporating seasonal produce enhances flavor and supports variety.
Step 14: Keep it Quick and Simple
The key to no-bake treats is simplicity:
- Minimal Ingredients: Stick to 4–6 ingredients for efficiency.
- Short Preparation Time: Aim for 10–15 minutes from start to finish.
- Easy Cleanup: Use lined trays or parchment paper to minimize mess.
- Reusable Tools: Silicone molds and ice cube trays speed up shaping.
Simplicity ensures no-bake treats remain a convenient option rather than a chore.
Step 15: Enjoy and Share
Finally, the best part of making no-bake treats is enjoying them:
- Serve Fresh: Treats are best consumed shortly after preparation.
- Share With Others: Pack in small jars or boxes as gifts or snacks for friends and family.
- Pair With Beverages: Tea, coffee, or milk enhances the snack experience.
- Celebrate Creativity: Appreciate your quick, tasty creation.
Sharing and enjoying treats makes the experience rewarding and satisfying.
Conclusion
No-bake treats are a versatile, quick, and delightful way to satisfy sweet cravings without spending hours in the kitchen. By following a stepwise approach—preparing ingredients, choosing the right base, mixing thoroughly, shaping, and chilling if necessary—you can whip up tasty snacks in under 15 minutes. Customizing flavors, adding texture, and experimenting with seasonal ingredients ensures treats are fun, healthy, and appealing.
Whether for kids, adults, or on-the-go snacks, no-bake treats provide convenience, nutrition, and creativity. With the steps outlined above, anyone can enjoy delicious homemade snacks without needing an oven, complicated recipes, or professional skills.
FAQs
Q1: Can I make no-bake treats without nuts?
Yes. You can use seeds, oats, dried fruits, or nut-free butters like sunflower seed butter as alternatives.
Q2: How long do no-bake treats last?
Most last 3–5 days in the fridge, or up to 2 weeks if frozen properly.
Q3: Can children make these treats safely?
Absolutely. Most recipes require mixing and shaping, making them safe and fun for kids with adult supervision.
Q4: Can I make treats gluten-free?
Yes. Use gluten-free oats, gluten-free cookies, or almond meal as substitutes.
Q5: How can I make no-bake treats healthier?
Reduce added sweeteners, use natural ingredients, incorporate seeds and nuts, and opt for whole grains instead of refined ingredients.